A few years ago, I created a tutorial on setting up Visual Studio Code for development with the STM32. Since I’ve also been developing on the Nordic nRF52, I thought I’d share another tutorial to show how a project can be set up, flashed, and debugged using Visual Studio Code.
The template project discussed in this post can be found on Github.
Instructions
The Nordic toolchain is cross-platform, but the instructions below are specifically for Linux. However, they can easily be replicated in Windows as long as installation paths and environment variables are set correctly.
General Comments
When using any editor + terminal for nRF52 development, the things to remember are:
- GCC path is set in
<sdk>/components/toolchain/gcc/Makefile.posix - Makefile is up to date with:
SDK_ROOTis pointed to where<sdk>is located- Source and header files for new components
- Board/component configurations in
sdk_config.h
With Visual Studio Code:
- In
.vscode/c_cpp_properties.json, updatedefines,includePath, andcompilerPathas required - In
.vscode/launch.json, updateexecutableandarmToolchainPathas required - In
.vscode/tasks.json, update the current working directorycwdandcommandas required (ie. changing tomake flash -j8to use 8 cores to build).
Installation
System Tools
sudo apt install build-essential

# Required by java-based CMSIS Configuration Wizard
sudo apt install default-jre
Code Editor
- Visual Studio Code
- C/C++ Extension by Microsoft
- Cortex-Debug Extension by marus25
nRF52 Toolchain
Download
- nRF52 SDK
- nRF52 Command Line Tools
- Segger J-Link Software Tools
- GNU-RM Embedded Toolchain for ARM
- It’s recommended to install the GCC version that matches the Nordic SDK version. Check the GCC version in
<sdk>/components/toolchain/gcc/Makefile.posixand download the appropriate version. - For nRF5 SDK 15.3.0, the gcc version is
gcc-arm-none-eabi-7-2018-q2-update
- It’s recommended to install the GCC version that matches the Nordic SDK version. Check the GCC version in
Optional:
Setup
Run the commands below to extract the archives to the respective paths.
- nRF5_SDK to
$HOME - nRF Command Line Tools to
/opt/and/usr/local/bin - gcc-arm-none-eabi to
/usr/local/bin
# Unpack SDK to home directory
unzip nRF5_SDK_15.3.0_59ac345.zip -d $HOME

# Unpack nRF command line tools and make accessible in terminal
tar -xvf nRF-Command-Line-Tools_9_8_1_Linux-x86_64.tar --directory /opt/
sudo ln -s /opt/nrfjprog/nrfjprog /usr/local/bin/nrfjprog

# Install Segger
sudo apt install ./JLink_Linux_V644f_x86_64.deb

# Unpack gcc toolchain to /usr/local/bin
sudo tar -xjvf gcc-arm-none-eabi-8-2018-q4-major-linux.tar.bz2 --directory /usr/local/bin
If optional tools are downloaded:
# Segger Ozone
sudo apt install ./Ozone_Linux_V262_x86_64.deb
Check nrfjproj --version that it’s been installed correctly.
Nordic SDK Setup
In the nRF52 SDK folder, update the values in components/toolchain/gcc/Makefile.posix:
GNU_INSTALL_ROOTGNU_VERSION
This is only required if using a different gcc version than specified. It’s recommended to use the same one as the SDK.
Using the Project
Setup
In blinky/ directory, do a global search and replace to update the SDK root to wherever your nRF5_SDK directory is:
- From:
SDK_ROOT := ../../../../../.. - To:
SDK_ROOT := $(HOME)/nRF5_SDK_15.3.0_59ac345
If required, update the following in .vscode/c_cpp_properties.json:
- Include paths
- Defines based on C/assembler flags in the Makefile
Configuring sdk_config.h
CMSIS Configuration Wizard is integrated with example makefiles. In order to open sdk_config.h in this tool, type:
make sdk_config
Build and Flash
cd blinky/pca10056/mbr/armgcc

# To just build. Optional `-jN` flag, where N is number of cores to use
make

# To build and flash
make flash

# If a SoftDevice is included in your project
make flash_softdevice
Build tasks can also be added to .vscode/tasks.json. Pressing CTRL+SHIFT+B will execute the default build task (in this case, the default build task is make flash for PCA10056).
Segger RTT Log
To use the RTT Viewer equivalent on GNU/Linux, start by opening a terminal and starting JLinkExe.
Follow the steps below to connect the device (in this case, NRF52840_XXAA). Press ENTER to accept the default value. The only option that needs to be changed (aside from board, if necessary) is the target interface (use SWD instead of JTAG).
J-Link>connect
Device>
Please specify target interface:
  J) JTAG (Default)
  S) SWD
  T) cJTAG
TIF>S
Specify target interface speed [kHz]. <Default>: 4000 kHz
Speed>
Device "NRF52840_XXAA" selected.
Alternatively, you can specify the configurations in the command line:
JLinkExe -device NRF52832_XXAA -if SWD -speed 4000 -autoconnect 1
In another terminal, start JLinkRTTClient. RTT output should now start displaying. Output should be as follows:
###RTT Client: ************************************************************
###RTT Client: *               SEGGER Microcontroller GmbH                *
###RTT Client: *   Solutions for real time microcontroller applications   *
###RTT Client: ************************************************************
###RTT Client: *                                                          *
###RTT Client: *       (c) 2012 - 2016  SEGGER Microcontroller GmbH       *
###RTT Client: *                                                          *
###RTT Client: *     www.segger.com     Support: support@segger.com       *
###RTT Client: *                                                          *
###RTT Client: ************************************************************
###RTT Client: *                                                          *
###RTT Client: * SEGGER J-Link RTT Client   Compiled Apr 12 2019 17:30:19 *
###RTT Client: *                                                          *
###RTT Client: ************************************************************

###RTT Client: -----------------------------------------------
###RTT Client: Connecting to J-Link RTT Server via localhost:19021  Connected.
SEGGER J-Link V6.44f - Real time terminal output
J-Link OB-SAM3U128-V2-NordicSemi compiled Jan  7 2019 14:07:15 V1.0, SN=683903307
Process: JLinkExe
<info> app: SPI example started.
<info> app: Transfer completed.
<info> app: Transfer completed.
<info> app: Transfer completed.
...
Debugging
Visual Studio Code
- Open the debug pane (
CTRL+SHIFT+D) and select Cortex-Debug. - To create a new configuration, select Add Configuration and choose Cortex-Debug.
- If required, update the
executableand/orarmToolchainPathin.vscode/launch.json. - Hit
F5to start debugging.
Segger O-zone
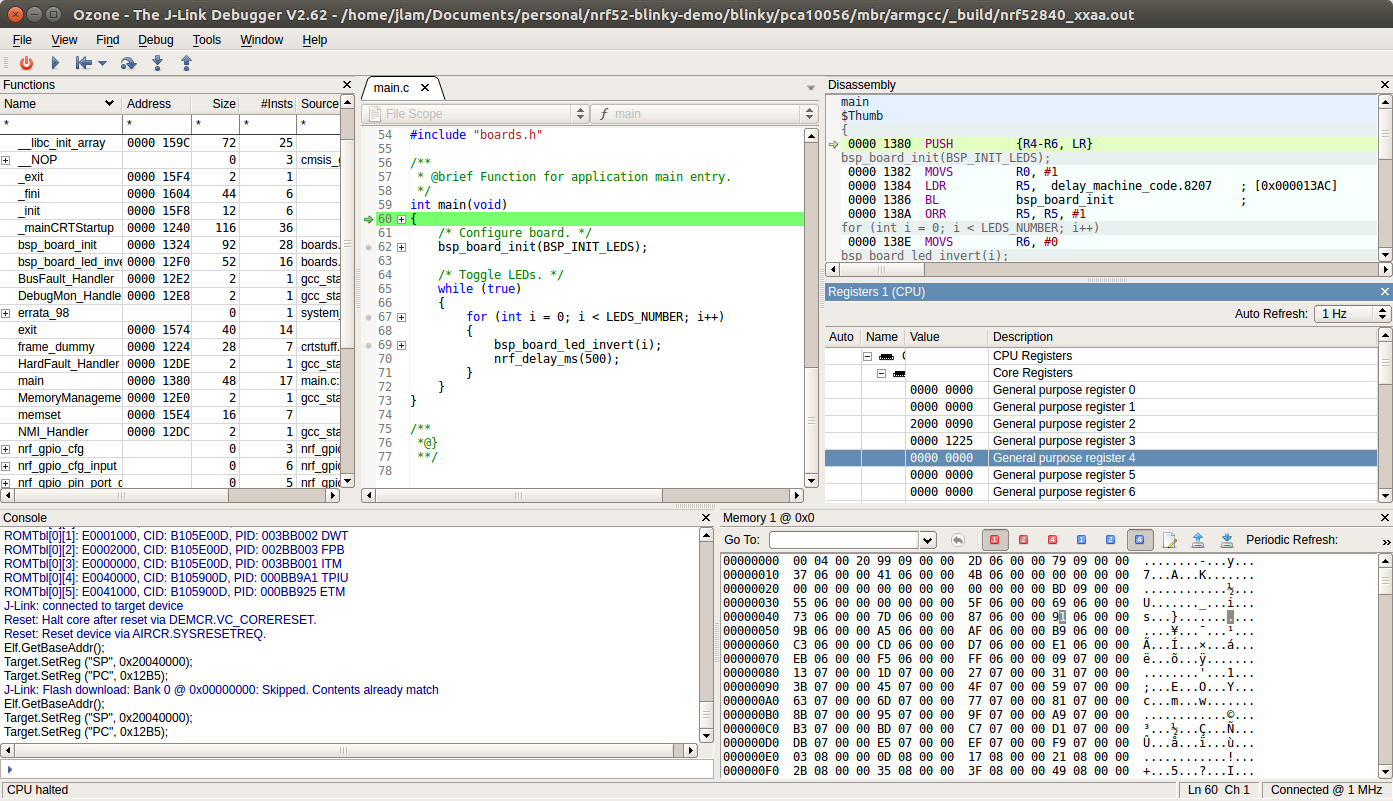
Using Segger Ozone provides rich insights on memory, assembly instructions, peripheral registers, etc.
New project settings:
- Select Create new project
- Choose target device
- Select device:
nRF52840_xxAA(or other) - Peripherals: (blank)
- Select device:
- Connection settings
- Target interface: SWD
- Target interface speed: 1 MHz
- Host interface: USB
- Serial no: (blank)
- Program file
- Select
pca10056/mbr/armgcc/_build/nrf52840_xxaa.out
- Select
Resources
- Nordic Information Center - Official Documentation
Happy developing!

